valinet / ExplorerPatcher
- вторник, 12 октября 2021 г. в 00:38:45
This project aims to bring back a productive working environment on Windows 11.
This project aims to bring back a productive working environment on Windows 11.

In the Releases section, you will find a download for a DLL called dxgi.dll. It has been tested on the latest stable build of Windows 11 (22000.194), but it may work just fine on newer builds too. This is the runtime part of the application. You need to place this DLL in the following location: C:\Windows. This will enable the following functionality:
UndockingDisabled)Win+X) when using the classic taskbarLeft/Center) specified in Settings\Personalization\Taskbar\Taskbar behaviors\Taskbar alignmentAlso, if you place the StartAllBackX64.dll file from StartAllback (needs a DLL with SHA-256: D8D1484D6F7DE94C5018B03A5A93EE8BBB7795BCA5408A721CBB74BE28065689) in the folder %appdata%\ExplorerPatcher (create if it does not exist), the following additional features will be enabled:
After you have completed the above setup, make sure you have an active Internet connection and restart the Explorer process using Task Manager or by issuing the following command: taskkill /f /im explorer.exe. Once File Explorer restarts, some necessary files (symbol files) will be downloaded from Microsoft (around 50MB). This should be relatively quick, depending on your Internet connection speed. When this is done, File Explorer will restart again and will be ready for use. Notifications should show up informing you about the progress, and you can also use Task Manager to watch for network activity. This process only happens when a new Windows 11 build is installed on the machine.
Now, the classic taskbar should be enabled. Still, there is some more setup to do, depending on your preferences.
To configure the most common options, the application now comes with a configuration user interface. To open it, right click the Start button (or press Win+X) and choose "Properties". Alternatively, to open the GUI standalone, run the following command: rundll32.exe C:\Windows\dxgi.dll,ZZGUI.
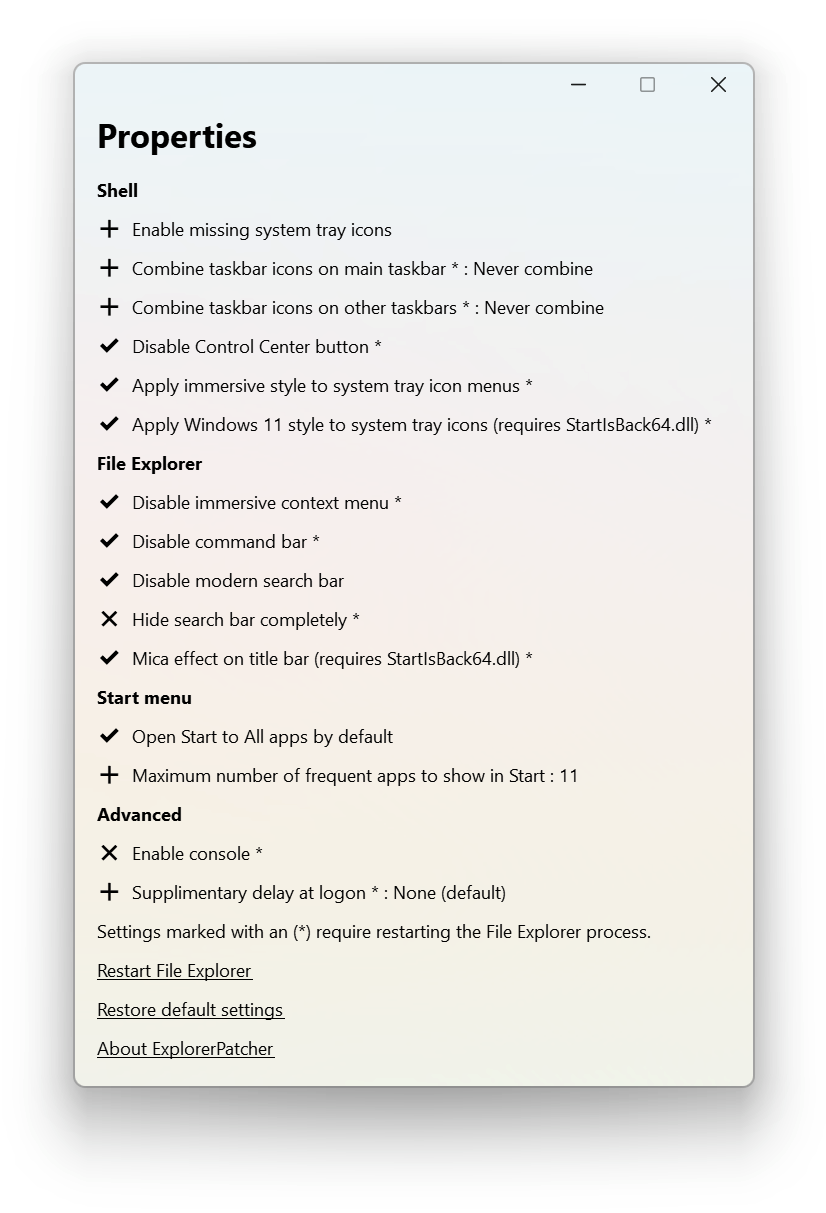
The icon near an option signifies its current state:
The links at the bottom allow you to perform the most frequent actions.
Here is a list of things you may want to try to fix/enhance a few of the aspects which are not addressed by this patcher directly:
As you will notice, the battery flyout in the taskbar is broken in Windows 11. You can replace it with a much better alternative called Battery Mode which has all the stock options and more.
To disable the blue highlight in the context menu and return to the classic gray highlight from early Windows 11 builds, read here.
If you want the same behavior as the default one in Windows 11, which is to have the icons centered along with the Start button, but would like to use this proper classic taskbar which has features like button labels, toolbars and more, you can use my fork of the popular TaskbarX program which fixes compatibility with Windows 11 and adds this behavior; a guide about how to set it up is available here.
You can try one of my other utilities available here.
To learn how to configure all the options manually, read on:
As you have noticed, some system tray icons are missing (for example, the clock, notification center button, network, battery, sound etc). To enable these icons, open the following using Run:
%windir%\explorer.exe shell:::{05d7b0f4-2121-4eff-bf6b-ed3f69b894d9}\SystemIcons
In the window that appears, toggle to On whatever icons you would like to have enabled in the taskbar.
One of the great features the old taskbar had was the ability to ungroup the taskbar buttons, showing a button with a label for each window that the user currently has open. To enable this functionality, run either of the following commands, depending on your preference.
reg.exe add "HKCU\Software\Microsoft\Windows\CurrentVersion\Policies\Explorer" /f /v "NoTaskGrouping" /t REG_DWORD /d 1
reg.exe add "HKCU\Software\Microsoft\Windows\CurrentVersion\Explorer\Advanced" /f /v "TaskbarGlomLevel" /t REG_DWORD /d 2
reg.exe add "HKCU\Software\Microsoft\Windows\CurrentVersion\Explorer\Advanced" /f /v "MMTaskbarGlomLevel" /t REG_DWORD /d 2
In the commands above, change 2 to 0 for "Always combine" and 2 to 1 for "Combine when taskbar is full`.
As you probably have noticed, Windows 11 introduced a simplified context menu in File Explorer. To get to the old menu which contains all entries from shell extensions, one has to click on "Show more options" or type Shift+F10. To disable this new menu, run the following command:
reg.exe add "HKCU\Software\Classes\CLSID\{86ca1aa0-34aa-4e8b-a509-50c905bae2a2}\InprocServer32" /f /ve
To restore back the immersive menu, run:
reg.exe delete "HKCU\Software\Classes\CLSID\{86ca1aa0-34aa-4e8b-a509-50c905bae2a2}" /f
In Windows 11, File Explorer comes with a command bar instead of the traditional ribbon. To disable this and get back the ribbon, run the following command:
reg.exe add "HKCU\Software\Classes\CLSID\{d93ed569-3b3e-4bff-8355-3c44f6a52bb5}\InprocServer32" /f /ve
To restore back the command bar, run:
reg.exe delete "HKCU\Software\Classes\CLSID\{86ca1aa0-34aa-4e8b-a509-50c905bae2a2}" /f
If you want to get back the command bar from Windows 7, after enabling back the ribbon, OldNewExplorer will allow you to do so, and many more options, like drive ungrouping in This PC, as it used to be prior to Windows 8.1.
In Windows 10 1903, Microsoft introduced a new search box in File Explorer. This new search control is clunky, does not search automatically and usually is kind of broken. The old search box remains available, but only in Control Panel windows. To enable it on all File Explorer windows, run the following command:
reg.exe add "HKCU\Software\Classes\CLSID\{1d64637d-31e9-4b06-9124-e83fb178ac6e}\TreatAs" /f /ve /t REG_SZ /d "{64bc32b5-4eec-4de7-972d-bd8bd0324537}"
To restore the modern search box, run:
reg.exe delete "HKCU\Software\Classes\CLSID\{1d64637d-31e9-4b06-9124-e83fb178ac6e}" /f
Also, in the next section, which desribes the configuration options for the software, you will learn about how to disable the search box altogether, should you want to.
Now that you have set up the basic stuff, you can choose to enable additional settings to enhance the experience even more. For this, customize the following commands by changing the number acording to your needs:
HideExplorerSearchBar completely removes the search box in File Explorer (default = 0)
reg.exe add "HKCU\Software\Microsoft\Windows\CurrentVersion\Explorer\ExplorerPatcher" /f /v "HideExplorerSearchBar" /t REG_DWORD /d 1
HideControlCenterButton disables the Control Center button and its associated shortcut key (Win+A) (default = 0)
reg.exe add "HKCU\Software\Microsoft\Windows\CurrentVersion\Explorer\ExplorerPatcher" /f /v "HideControlCenterButton" /t REG_DWORD /d 1
MicaEffectOnTitlebar enables Mica effect on File Explorer windows (requires StartIsBack64.dll) (default = 0)
reg.exe add "HKCU\Software\Microsoft\Windows\CurrentVersion\Explorer\ExplorerPatcher" /f /v "MicaEffectOnTitlebar" /t REG_DWORD /d 1
SkinMenus applies the immersive skin to "Safe to Remove Hardware" and "Bluetooth" pop-up menus (default = 1)
reg.exe add "HKCU\Software\Microsoft\Windows\CurrentVersion\Explorer\ExplorerPatcher" /f /v "SkinMenus" /t REG_DWORD /d 1
SkinIcons applies Windows 11 icon skins to taskbar buttons (requires StartIsBack64.dll) (default = 1)
reg.exe add "HKCU\Software\Microsoft\Windows\CurrentVersion\Explorer\ExplorerPatcher" /f /v "SkinIcons" /t REG_DWORD /d 1
AllocConsole will display a console window (for debugging purposes) (default = 0, for advanced users only)
reg.exe add "HKCU\Software\Microsoft\Windows\CurrentVersion\Explorer\ExplorerPatcher" /f /v "AllocConsole" /t REG_DWORD /d 1
ExplorerReadyDelay adds even more delay before the shell is announced that Explorer is ready loading (helps if you experience a delay at logon) - the unit is ms (milliseconds), 1000ms = 1 second (default = 0, for advanced users only)
reg.exe add "HKCU\Software\Microsoft\Windows\CurrentVersion\Explorer\ExplorerPatcher" /f /v "ExplorerReadyDelay" /t REG_DWORD /d 1000
Also, if you chose to place the patcher in C:\Windows\SystemApps\Microsoft.Windows.StartMenuExperienceHost_cw5n1h2txyewy as well, use the following commands to configure Start menu options:
Open Start menu to "All apps" directly (replace with 0 to disable)
reg.exe add "HKCU\Software\Microsoft\Windows\CurrentVersion\Explorer\StartPage" /f /v "MakeAllAppsDefault" /t REG_DWORD /d 1
Show only 4 most recent apps (change the number to customize)
reg.exe add "HKCU\Software\Microsoft\Windows\CurrentVersion\Explorer\Advanced" /f /v "Start_MaximumFrequentApps" /t REG_DWORD /d 4
Even more registry configuration settings are described in the following document, make sure to take a look on it here.
First, move the taskbar to the bottom, if you have moved it to the top or to the sides. This is so that the Windows 11 taskbar can render correctly.
Then, to uninstall, rename the DLL in the locations where you placed it from dxgi.dll to dxgio.dll. Then, reboot the computer and delete the dxgio.dll file from the locations where it is placed. You can also then safely delete the %appdata%\ExplorerPatcher directory as well.
A changelog is available here.
The way the application gets loaded is by exploiting the DLL search order in Windows. I take advantage of the fact that Explorer is one of the few system processes located in %windir% and not in %windir%\System32, so it does not affect most apps. Also, %windir% is not first in the search path. Read more about this technique here. The main advantage here is that you do not have to keep an extra process running in the memory; plus, due to the diverse nature of how Explorer is launched, hooking it can be difficult.
I picked dxgi.dll because it is not on the HKEY_LOCAL_MACHINE\SYSTEM\CurrentControlSet\Control\Session Manager\KnownDLLs list, because it has few exports and is loaded very early by Explorer, when calling the DXGIDeclareAdapterRemovalSupport() function.
If you still feel a bit iffy running this, then that's why the source code is available on the web site. You can take a look and even compile the DLL yourself and make an informed decision when running the software. Never run untrusted binaries from questionable sources, especially when you lack access to the source code and a way to reproduce that binary.
Hooking is done using the excellent funchook library (GPLv2 with linking exception), which in turn is powered by the diStorm3 (3-clause BSD) disassembler. Thus, I am offering this under GNU General Public License Version 2.0, which I believe is compatible.
The following prerequisites are necessary in order to compile this project:
Microsoft C/C++ Optimizing Compiler - this can be obtained by installing either of these packages:
Download either of those here. The guide assumes you have installed either Visual Studio 2019, either Build Tools for Visual Studio 2019.
A recent version of the Windows SDK - for development, version 10.0.19041.0 was used, available here (this may also be offered as an option when installing Visual Studio)
CMake - for easier usage, make sure to have it added to PATH during installation
Git - you can use Git for Windows, or git command via the Windows Subsystem for Linux.
Steps:
Clone git repo along with all submodules
git clone --recursive https://github.com/valinet/ExplorerPatcher
If "git" is not found as a command, type its full path, or have its folder added to PATH, or open Git command window in the respective folder if using Git for Windows.
Compile funchook
cd libs
cd funchook
md build
cd build
cmake -G "Visual Studio 16 2019" -A x64 ..
If "cmake" is not found as a command, type its full path, or have its folder added to PATH.
Type "Win32" instead of "x64" above, if compiling for x86. The command above works for x64.
Now, in the libs\funchook\build folder, open the file funchook-static.vcxproj with any text editor, search and replace all occurences of <RuntimeLibrary>MultiThreadedDLL</RuntimeLibrary> with <RuntimeLibrary>MultiThreaded</RuntimeLibrary>.
Once done, you can now compile funchook:
cmake --build . --config Release
Compile ExplorerPatcher
Double click the ExplorerPatcher.sln to open the solution in Visual Studio. Choose Release and your processor architecture in the toolbar. Press F6 to compile.
Open an "x86 Native Tools Command Prompt for VS 2019" (for x86), or "x64 Native Tools Command Prompt for VS 2019" (for x64) (search that in Start), go to folder containing solution file and type:
For x86:
msbuild ExplorerPatcher.sln /property:Configuration=Release /property:Platform=x86
For x64:
msbuild ExplorerPatcher.sln /property:Configuration=Release /property:Platform=x64
The resulting exe and dll will be in "Release" folder (if you chose x86), or "x64\Release" (if you chose x64) in the folder containing the solution file.
That's it. later, if you want to recompile, make sure to update the repository and the submodules first:
git pull
git submodule update --init --recursive