Telegram бот на python против COVID-19
- четверг, 23 апреля 2020 г. в 00:26:59

В связи с обстановкой тотальной паники и дезинформации которая льется к нам из абсолютно всех каналов таких как мессенджеры, новостные сайты, радио, телевидение было принято решение показать как можно победить коронавирус с помощью бота на python и других интересных ингредиентов для Telegram (шутка)!
Для приготовления вакцина-бота в домашних условиях требуется эвм, python, docker, heroku CLI, telegram мессенджер как платформа и mongoDB в качестве базы данных. Всем остальным можно пренебречь в начале нашего рассказа, в конце будет предоставлен полный список и дозировка для критического анализа и дальнейшего развития.
Начнем с того, что определимся, что мы хотим сделать, это телеграмм бот который будет уметь показывать:
Чему мы научимся во время приготовления вакцина-бота:
Затем необходимо зарегистрировать нашего бота в Telegram и получить токен для работы с ним из нашего кода. Процедура тривиальная, но все же для тех кто не знаком с платформой опишу пошагово:
Для того чтобы подготовить машину к программированию бота для Telegram необходимо поставить на нее следующее программное обеспечение:
Структура приложения может быть выбрана вами в зависимости от ваших потребностей, целей и опыта. Но перед этим предлагаю вам создать репозиторий на github с названием вашего бота и склонировать его к себе на машину, это необходимо для использования системы контроля версий и настройки CI в перспективе.
Наш вакцина-бот внутри будет иметь вот такую структуру
tree -L 2
├── Dockerfile
├── .gitignore
├── README.md
├── common
│   ├── containers.py
│   └── tg_analytics.py
├── data
│   └── mongo_context.py
├── data.csv
├── heroku.yml
├── setup.py
├── requirements.txt
├── services
│   ├── country_service.py
│   └── statistics_service.py
└── templates
    ├── contacts.html
    ├── country_statistics.html
    ├── himydear.html
    ├── idunnocommand.html
    ├── notfound.html
    └── query_statistics.html
Далее настроим виртуальное окружение для проекта, для этого нам необходимо пойти в директорию проекта с помощью терминала командной строки и выполнить команду следующего содержания:
python -m venv env # создание виртуального окружения
sourse env/bin/activate # активация виртуального окружения
Виртуальное окружение необходимо для установки различных зависимостей(пакетов и модулей) локально относительно проекта, если устанавливать пакеты без виртуального окружения в проекте, то они устанавливаются глобально относительно самой машины, что в свою очередь может привести к проблемам при работе с другими проектами.
Если по какой-то причине вам необходимо деактивировать виртуальное окружение и установить что-то глобально для всех проектов, то сделать это можно зайдя в директорию проекта через терминал командной строки и выполнив команду:
deactivate # деактивация виртуального окружения
Далее создадим файл зависимостей и основной скрипт который будем запускать в директории проекта. Что такое зависимости можно подробно почитать тут, идем дальше.
touch requirements.txt # создание файла зависимостей
touch setup.py # создание python скрипта
Список зависимостей для нашего проекта состоит из:
Важно в файле зависимостей указать версии библиотек, чтобы потом при установке не возникло проблем с обратной совместимостью.
requests==2.23.0
pytelegrambotapi==3.6.7
pymongo==3.10.1
dependency_injector==3.15.6
geocoder==1.38.1
jinja2==2.11.1
ciso8601==2.1.3
cachetools==4.0.0
pandas==1.0.3
flask==1.1.2
На этом подготовительные работы закончены можем приступать непосредственно к программированию. Сначала мы сделаем заготовку которая позволит нам проверить работает ли вообще наш бот, корректно ли взаимодействует с API, выполняет ли команды и приказы ;).
Чтобы продолжить нам необходимо установить зависимости из файла requirements.txt в наше приложение с помощью команды в терминале командной строки, но прежде чем это делать проверьте включили ли вы виртуальное окружение для проекта о котором говорилось выше:
pip install -r requirements.txt #установка зависимостей проекта
После того как зависимости установлены, открываем редактор и напишем первый обработчик команды для нашего бота.
# /setup.py file
#!/usr/bin/env python3
# -*- coding: utf-8 -*-
# dependencies
import telebot
import os

from telebot import types

# bot initialization
token = os.getenv('API_BOT_TOKEN')
bot = telebot.TeleBot(token)


# start command handler
@bot.message_handler(commands=['start'])
def command_start_handler(message):
    cid = message.chat.id
    bot.send_chat_action(cid, 'typing')
    markup = types.ReplyKeyboardMarkup(row_width=1, resize_keyboard=True)
    button_geo = types.KeyboardButton(text='send location', request_location=True)
    markup.add(button_geo)
    bot.send_message(cid, 'Hello stranger, please choose commands from the menu', reply_markup=markup)


# application entry point
if __name__ == '__main__':
    bot.polling(none_stop=True, interval=0)
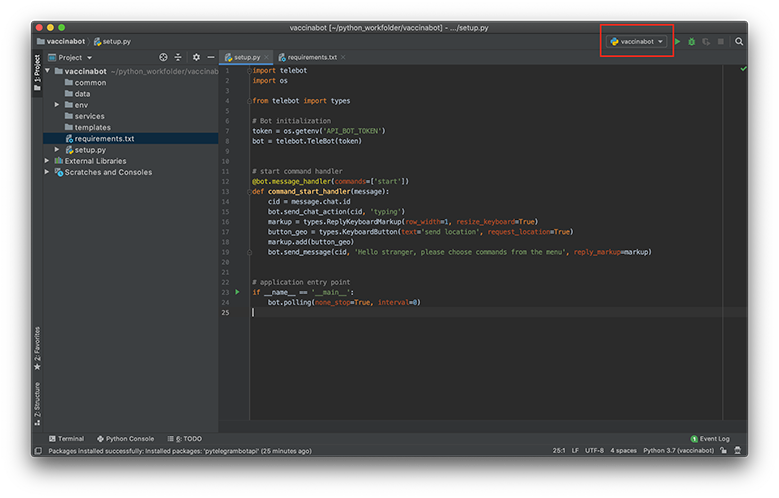
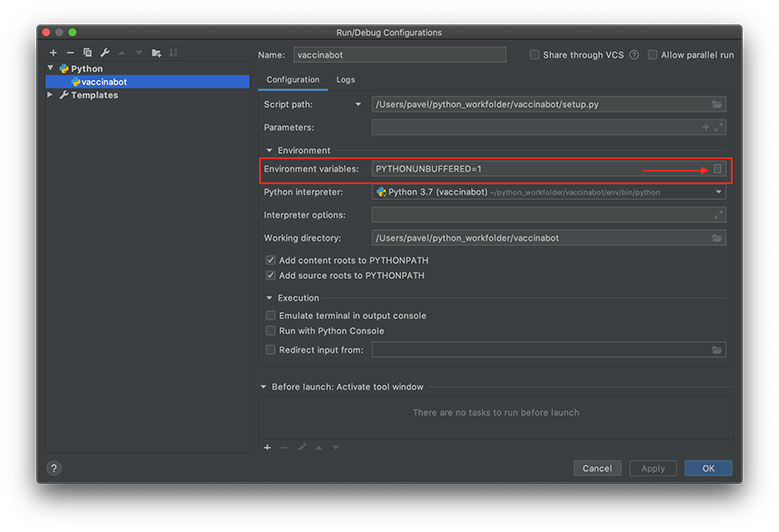
Прежде чем запустить бота, давайте зададим переменную окружения API_BOT_TOKEN, через pycharm IDE это можно сделать вот так. В правом верхнем углу есть выпадающее меню с названием “Edit configurations”, нажимаем на это меню, настраиваем конфигурацию и задаем переменную окружения, значение берем из блокнота куда мы сохранили token ранее.
А вот так выглядит визард где необходимо непосредственно задать переменную
После этого запускаем нашего бота и переходим в приложение Telegram для его проверки.
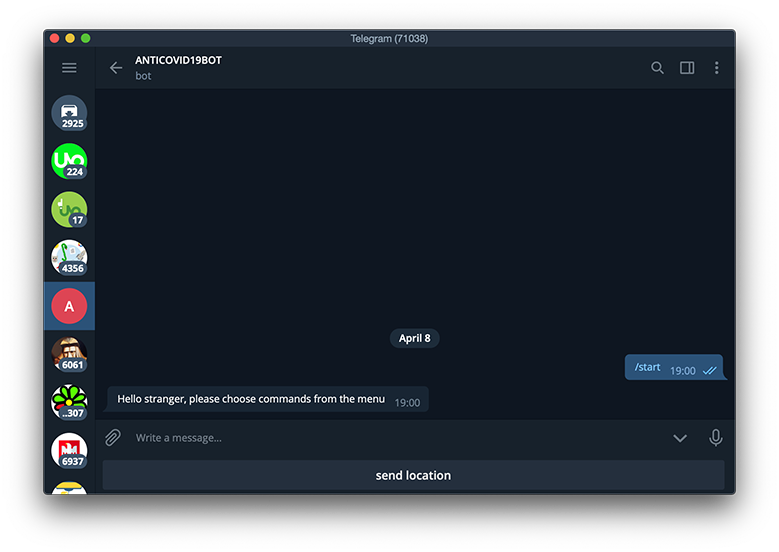
Супер, бот отвечает как и ожидалось и рисует клавиатуру с кнопкой “send location”, давайте продолжим и напишем обработчики команд «contacts», «help» и добавим немного функциональности нашему вакцина-боту.
Важно упомянуть что бот умеет отвечать разметкой HTML и Markdown, тэги которые поддерживает Telegram можно посмотреть вот здесь. Мы будем пользоваться HTML для эстетического удовольствия.
# /setup.py file
#!/usr/bin/env python3
# -*- coding: utf-8 -*-

known_users = []
user_steps = {}
commands = {
    'start': 'Start using this bot',
    'help': 'Useful information about this bot',
    'contacts': 'Contacts'
}

# decorator for bot actions
def send_action(action):
    """Sends `action` while processing func command."""

    def decorator(func):
        @wraps(func)
        def command_func(message, *args, **kwargs):
            bot.send_chat_action(chat_id=message.chat.id, action=action)
            return func(message, *args, **kwargs)
        return command_func
    return decorator


# help command handler
@bot.message_handler(commands=['help'])
@send_action('typing')
def command_help_handler(message):
    help_text = 'The following commands are available: \n'
    for key in commands:
        help_text += '/' + key + ': '
        help_text += commands[key] + '\n'
    help_text += 'ANTICOVID19BOT speaks english, be careful and take care!'
    bot.send_message(message.chat.id, help_text)


# contacts command handler
@bot.message_handler(commands=['contacts'])
@send_action('typing')
def command_contacts_handler(message):
    with codecs.open('templates/contacts.html') as file:
        template = Template(file.read())
        bot.send_message(message.chat.id, template.render(username=message.chat.username), parse_mode='HTML')
Также в качестве фана сделаем сохранение запросов пользователей и их получение из базы данных.
# /data/mongo_context.py
#!/usr/bin/env python3
# -*- coding: utf-8 -*-
# dependencies
import os

from datetime import datetime
from pymongo import MongoClient


class MongoDbContext:
    """Mongo database context class"""

    # constructor of class
    def __init__(self):
        try:
            self.connection_string = os.getenv('CONNECTION_STRING')
            self.client = MongoClient(self.connection_string)
        except Exception as e:
            raise e

    # save user query method
    def save_query(self, country, user_name):
        db = self.client[os.getenv('DB_NAME')]
        countries_stats = db.country_stats
        result = countries_stats.insert_one({'date': datetime.now(), 'country': country, 'username': user_name})

    # get users queries method
    def get_users_queries(self):
        db = self.client[os.getenv('DB_NAME')]
        countries_stats = db.country_stats
        queries = countries_stats.aggregate([
            {'$group': {'_id': '$country', 'count': {'$sum': 1}}},
            {'$sort': {'count': -1}},
            {'$limit': 5}
        ])
        users = countries_stats.aggregate([
            {'$group': {'_id': '$username', 'count': {'$sum': 1}}},
            {'$sort': {'count': -1}},
            {'$limit': 5}
        ])
        return {'queries': list(queries), 'users': list(users)}
Добавим еще немного кода для работоспособности нашего бота с точки зрения инфраструктуры.
# /common/containers.py
#!/usr/bin/env python3
# -*- coding: utf-8 -*-
# dependencies

import dependency_injector.containers as containers
import dependency_injector.providers as providers
from data.mongo_context import MongoDBContext


class DbContext(containers.DeclarativeContainer):
    """di for future development"""
    mongo_db_context = providers.Singleton(MongoDBContext)
Пришло время сервисов которые собственно и будут получать данные для нашего бота от сторонних API. В качестве API мы будем использовать два источника, первый источник это информация о статистике случаев заболевания по странам, второй источник это сервис геокодинга который преобразует координаты(широта, долгота) в название страны для того чтобы можно было использовать локацию которую отдает Telegram.
# /services/country_service.py
#!/usr/bin/env python3
# -*- coding: utf-8 -*-
# dependencies

import os
import requests

from cachetools import cached, TTLCache


class CountryService:
    """This class provide country information"""

    # 3 hours cache time
    cache = TTLCache(maxsize=100, ttl=10800)

    # method for getting country information by lat nad lng
    @cached(cache)
    def get_country_information(self, latitude, longitude):
        url = 'http://api.geonames.org/countrySubdivisionJSON'
        query_string = {'lat': latitude, 'lng': longitude, 'username': os.getenv('GEO_NAME_API_KEY')}
        geo_result = requests.request('GET', url, params=query_string)
        return geo_result.json()
# /services/statistics_service.py
#!/usr/bin/env python3
# -*- coding: utf-8 -*-
# dependencies

import os
import requests
import codecs
import ciso8601

from jinja2 import Template
from cachetools import cached, TTLCache
from common.containers import DBContext


class StatisticsService:
    """This class provide information about statistics"""

    # cache time 3 hours
    cache = TTLCache(maxsize=100, ttl=10800)

    def __init__(self):
        try:
            self.covid_api_token = os.getenv('COVID_STAT_API_TOKEN')
            self.db_context = DBContext.mongo_db_context()
        except Exception as e:
            raise e

    # method for getting statistics from API
    def __get_statistics_by_country_from_api(self, country_name):
        url = "https://covid-193.p.rapidapi.com/statistics"
        query_string = {'country': country_name}
        headers = {
            'x-rapidapi-host': "covid-193.p.rapidapi.com",
            'x-rapidapi-key': "db21e48371msh30968ff2ec637d3p19bd08jsn32426bcabdaf"
        }
        response = requests.request("GET", url, headers=headers, params=query_string)
        return response.json()

    # method for rendering statistics as html
    @cached(cache)
    def __get_statistics_by_country_as_html(self, country_name):
        try:
            statistics_json = self.__get_statistics_by_country_from_api(country_name)
            if len(statistics_json['response']) == 0:
                with codecs.open('templates/idunnocommand.html', 'r', encoding='UTF-8') as file:
                    template = Template(file.read())
                    return template.render(text_command=country_name)
            else:
                with codecs.open('templates/country_statistics.html', 'r', encoding='UTF-8') as file:
                    template = Template(file.read())
                    return template.render(date=ciso8601.parse_datetime(statistics_json['response'][0]['time']).date(),
                                           country=statistics_json['response'][0]['country'].upper(),
                                           new_cases=statistics_json['response'][0]['cases']['new'],
                                           active_cases=statistics_json['response'][0]['cases']['active'],
                                           critical_cases=statistics_json['response'][0]['cases']['critical'],
                                           recovered_cases=statistics_json['response'][0]['cases']['recovered'],
                                           total_cases=statistics_json['response'][0]['cases']['total'],
                                           new_deaths=statistics_json['response'][0]['deaths']['new'],
                                           total_deaths=statistics_json['response'][0]['deaths']['total'])
        except Exception as e:
            raise e

    # method for getting statistics by country_name
    def get_statistics_by_country_name(self, country_name, user_name):
        self.db_context.save_query(country_name, user_name)
        return self.__get_statistics_by_country_as_html(country_name)

    # method for getting statistics of users and queries
    def get_statistics_of_users_queries(self):
        query_statistics = self.db_context.get_users_queries()
        with codecs.open('templates/query_statistics.html', 'r', encoding='UTF-8') as file:
            template = Template(file.read())
            return template.render(queries=query_statistics['queries'], users=query_statistics['users'])
Далее добавим обработчики команд и аналитику для отслеживания использования нашего бота. Для аналитики в ботах можно использовать такой сервис как chatbase, но мы пойдем другим путем и сохраним аналитику самостоятельно в csv файл, больше для наглядности работы с ботом, нежели практического смысла. Код для аналитики я взял здесь, огромное спасибо его автору alekskram.
# /common/tg_analitycs.py
#!/usr/bin/env python3
# -*- coding: utf-8 -*-
# dependencies

import csv
import datetime
import os
import pandas as pd

users_type = {
    1: 'пользователь',
    2: 'пользователя',
    3: 'пользователя',
    4: 'пользователя'
}
day_type = {
    1: 'день',
    2: 'дня',
    3: 'дня',
    4: 'дня'
}


# remove txt file
def remove(user_id):
    path = os.getcwd() + '/%s.txt' % user_id
    os.remove(path)


# write data to csv
def statistics(user_id, command):
    data = datetime.datetime.today().strftime("%Y-%m-%d")
    with open('data.csv', 'a', newline="") as fil:
        wr = csv.writer(fil, delimiter=';')
        wr.writerow([data, user_id, command])


# make report
def analysis(bid, user_id):
    season = int(bid[1])
    df = pd.read_csv('data.csv', delimiter=';', encoding='utf8')
    number_of_users = len(df['id'].unique())
    number_of_days = len(df['data'].unique())

    message_to_user = 'Статистика использования бота за %s %s: \n' % (season, day_type.get(season, 'дней'))
    message_to_user += 'Всего статистика собрана за %s %s \n' % (number_of_days, day_type.get(season, 'дней'))
    if season > number_of_days:
        season = number_of_days
        message_to_user += 'Указанное вами количество дней больше,чем имеется\n' \
                           'Будет выведена статистика за максимальное возможное время\n'

    df_user = df.groupby(['data', 'id']).count().reset_index().groupby('data').count().reset_index()
    list_of_dates_in_df_user = list(df_user['data'])
    list_of_number_of_user_in_df_user = list(df_user['id'])
    list_of_dates_in_df_user = list_of_dates_in_df_user[-season:]
    list_of_number_of_user_in_df_user = list_of_number_of_user_in_df_user[-season:]
    df_command = df.groupby(['data', 'command']).count().reset_index()
    unique_commands = df['command'].unique()
    commands_in_each_day = []
    list_of_dates_in_df_command = list(df_command['data'])
    list_of_number_of_user_in_df_command = list(df_command['id'])
    list_of_name_of_command_in_df_command = list(df_command['command'])
    commands_in_this_day = dict()
    for i in range(len(list_of_dates_in_df_command)):
        commands_in_this_day[list_of_name_of_command_in_df_command[i]] = list_of_number_of_user_in_df_command[i]
        if i + 1 >= len(list_of_dates_in_df_command) or list_of_dates_in_df_command[i] != list_of_dates_in_df_command[
            i + 1]:
            commands_in_each_day.append(commands_in_this_day)
            commands_in_this_day = dict()
    commands_in_each_day = commands_in_each_day[-season:]

    if 'пользователи' in bid:
        message_to_user += 'За всё время бота использовало ' + '%s' % number_of_users \
                           + ' %s ' % users_type.get(number_of_users, 'пользователей') + '\n' \
                                                                                         'Пользователей за последние %s %s: \n' % (
                               season, day_type.get(season, 'дней'))
        for days, number, comm_day in zip(list_of_dates_in_df_user, list_of_number_of_user_in_df_user,
                                          commands_in_each_day):
            message_to_user += 'Дата:%s Количество:%d Из них новых:%s\n' % (days, number, comm_day.get('/start', 0))
    if 'команды' in bid:
        message_to_user += 'Статистика команд за последние %s %s: \n' % (season, day_type.get(season, 'дней'))
        for days, commands in zip(list_of_dates_in_df_user, commands_in_each_day):
            message_to_user += 'Дата:%s\n' % days
            for i in unique_commands:
                if i in commands:
                    message_to_user += '%s - %s раз\n' % (i, commands.get(i))
                else:
                    message_to_user += '%s - 0 раз\n' % i

    if 'txt' in bid or 'тхт' in bid:
        with open('%s.txt' % user_id, 'w', encoding='UTF-8') as fil:
            fil.write(message_to_user)
            fil.close()
    else:
        return message_to_user
Актуализируем наш главный скрипт который управляет ботом.
# /setup.py
#!/usr/bin/env python3
# -*- coding: utf-8 -*-
# dependencies

import telebot
import os
import codecs
import common.tg_analytics as tga

from functools import wraps
from telebot import types
from jinja2 import Template
from services.country_service import CountryService
from services.statistics_service import StatisticsService

# bot initialization
token = os.getenv('API_BOT_TOKEN')
bot = telebot.TeleBot(token)
user_steps = {}
known_users = []
stats_service = StatisticsService()
country_service = CountryService()
commands = {'start': 'Start using this bot',
            'country': 'Please, write a country name',
            'statistics': 'Statistics by users queries',
            'help': 'Useful information about this bot',
            'contacts': 'Developer contacts'}


def get_user_step(uid):
    if uid in user_steps:
        return user_steps[uid]
    else:
        known_users.append(uid)
        user_steps[uid] = 0
        return user_steps[uid]


# decorator for bot actions
def send_action(action):

    def decorator(func):
        @wraps(func)
        def command_func(message, *args, **kwargs):
            bot.send_chat_action(chat_id=message.chat.id, action=action)
            return func(message, *args, **kwargs)
        return command_func
    return decorator


# decorator for save user activity
def save_user_activity():

    def decorator(func):
        @wraps(func)
        def command_func(message, *args, **kwargs):
            tga.statistics(message.chat.id, message.text)
            return func(message, *args, **kwargs)
        return command_func
    return decorator


# start command handler
@bot.message_handler(commands=['start'])
@send_action('typing')
@save_user_activity()
def start_command_handler(message):
    cid = message.chat.id
    markup = types.ReplyKeyboardMarkup(row_width=1, resize_keyboard=True)
    button_geo = types.KeyboardButton(text='send location', request_location=True)
    markup.add(button_geo)
    bot.send_message(cid, 'Hello, {0}, please choose command from the menu'.format(message.chat.username),
                     reply_markup=markup)
    help_command_handler(message)


# country command handler
@bot.message_handler(commands=['country'])
@send_action('typing')
@save_user_activity()
def country_command_handler(message):
    cid = message.chat.id
    user_steps[cid] = 1
    bot.send_message(cid, '{0}, write name of country please'.format(message.chat.username))


# geo command handler
@bot.message_handler(content_types=['location'])
@send_action('typing')
@save_user_activity()
def geo_command_handler(message):
    cid = message.chat.id
    geo_result = country_service.get_country_information(message.location.latitude, message.location.longitude)
    statistics = stats_service.get_statistics_by_country_name(geo_result['countryName'], message.chat.username)
    user_steps[cid] = 0
    bot.send_message(cid, statistics, parse_mode='HTML')


# country statistics command handler
@bot.message_handler(func=lambda message: get_user_step(message.chat.id) == 1)
@send_action('typing')
@save_user_activity()
def country_statistics_command_handler(message):
    cid = message.chat.id
    country_name = message.text.strip()

    try:
        statistics = stats_service.get_statistics_by_country_name(country_name, message.chat.username)
    except Exception as e:
        raise e

    user_steps[cid] = 0
    bot.send_message(cid, statistics, parse_mode='HTML')


# query statistics command handler
@bot.message_handler(commands=['statistics'])
@send_action('typing')
@save_user_activity()
def statistics_command_handler(message):
    cid = message.chat.id
    bot.send_message(cid, stats_service.get_statistics_of_users_queries(), parse_mode='HTML')


# contacts command handler
@bot.message_handler(commands=['contacts'])
@send_action('typing')
@save_user_activity()
def contacts_command_handler(message):
    cid = message.chat.id
    with codecs.open('templates/contacts.html', 'r', encoding='UTF-8') as file:
        template = Template(file.read())
        bot.send_message(cid, template.render(user_name=message.chat.username), parse_mode='HTML')


# help command handler
@bot.message_handler(commands=['help'])
@send_action('typing')
@save_user_activity()
def help_command_handler(message):
    cid = message.chat.id
    help_text = 'The following commands are available \n'
    for key in commands:
        help_text += '/' + key + ': '
        help_text += commands[key] + '\n'
    help_text += 'ANTI_COVID_19_BOT speaks english, be careful and take care'
    bot.send_message(cid, help_text)


# hi command handler
@bot.message_handler(func=lambda message: message.text.lower() == 'hi')
@send_action('typing')
@save_user_activity()
def hi_command_handler(message):
    cid = message.chat.id
    with codecs.open('templates/himydear.html', 'r', encoding='UTF-8') as file:
        template = Template(file.read())
        bot.send_message(cid, template.render(user_name=message.chat.username), parse_mode='HTML')


# default text messages and hidden statistics command handler
@bot.message_handler(func=lambda message: True, content_types=['text'])
@send_action('typing')
@save_user_activity()
def default_command_handler(message):
    cid = message.chat.id
    if message.text[:int(os.getenv('PASS_CHAR_COUNT'))] == os.getenv('STAT_KEY'):
        st = message.text.split(' ')
        if 'txt' in st:
            tga.analysis(st, cid)
            with codecs.open('%s.txt' % cid, 'r', encoding='UTF-8') as file:
                bot.send_document(cid, file)
                tga.remove(cid)
        else:
            messages = tga.analysis(st, cid)
            bot.send_message(cid, messages)
    else:
        with codecs.open('templates/idunnocommand.html', 'r', encoding='UTF-8') as file:
            template = Template(file.read())
            bot.send_message(cid, template.render(text_command=message.text), parse_mode='HTML')

# application entry point
if __name__ == '__main__':
    bot.polling(none_stop=True, interval=0)
Чтобы проверить работоспособность, осталось добавить шаблоны на языке HTML в директорию «templates» и задать все переменные окружения которые нам необходимы
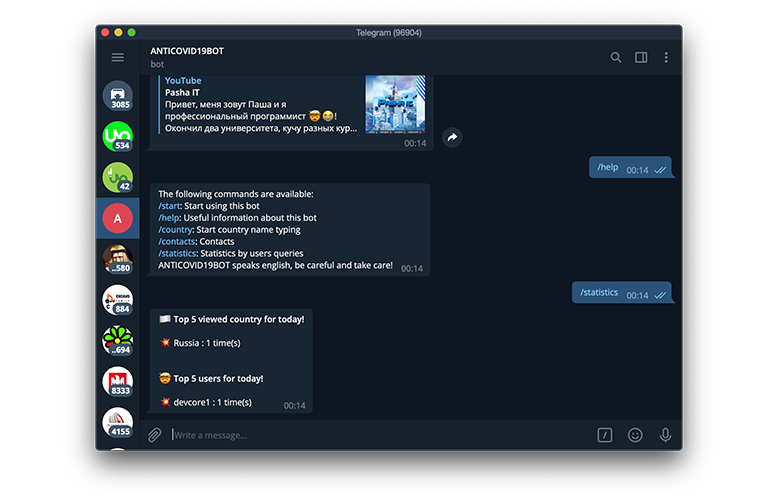
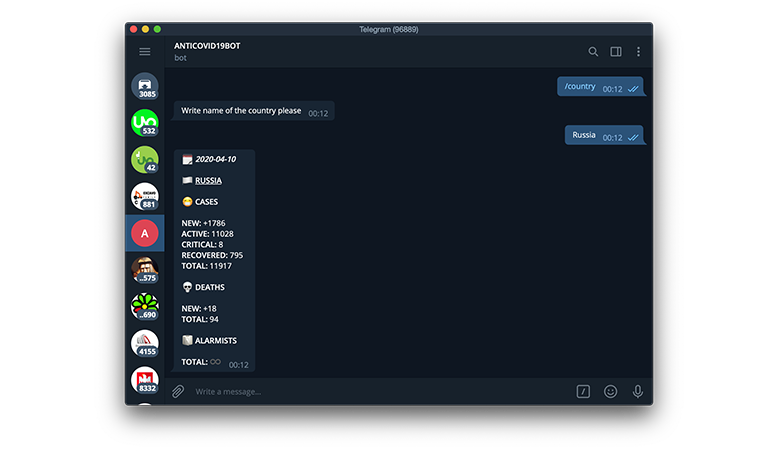
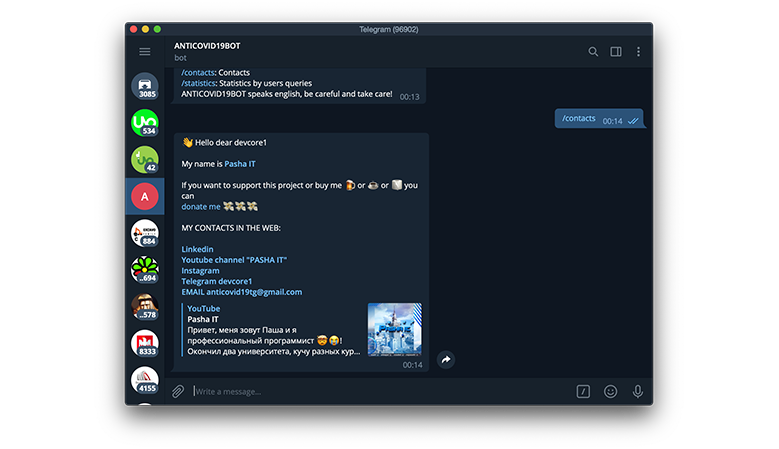
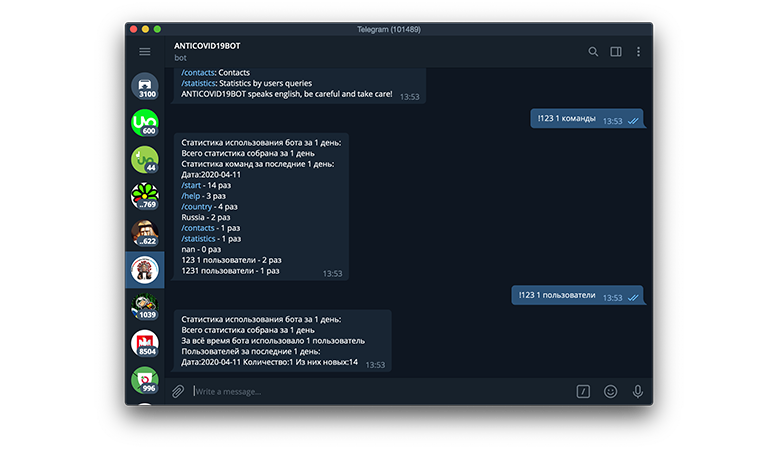
Найдем нашего бота в Telegram мессенджере по названию которые мы ему присвоили при создании через BotFather бота. И опросим его с помощью команд которые у нас запрограммированы. Чтобы команды отображались в меню бота, необходимо, задать их через Botfather бота. Также через BotFather бота можно задать нашему боту аватар, описание, и так далее.
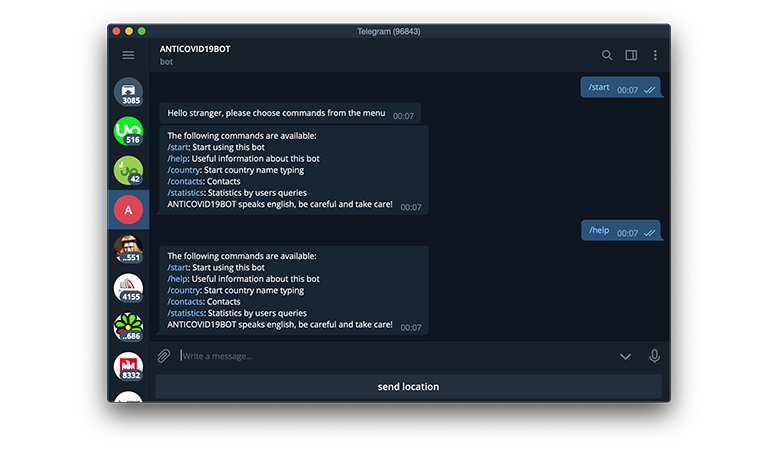

Для того чтобы наш бот работал без сбоев и проблем с платформой heroku, есть две рекомендации:
# /setup.py
#!/usr/bin/env python3
# -*- coding: utf-8 -*-
# dependencies

from flask import Flask, request

# set webhook
server = Flask(__name__)


@server.route('/' + token, methods=['POST'])
def get_message():
    bot.process_new_updates([telebot.types.Update.de_json(request.stream.read().decode("utf-8"))])
    return "!", 200


@server.route("/")
def web_hook():
    bot.remove_webhook()
    bot.set_webhook(url=os.getenv('HEROKU_URL') + token)
    return "!", 200

if __name__ == "__main__":
    server.run(host="0.0.0.0", port=int(os.environ.get('PORT', 8443)))
На этом работу с ботом можно считать оконченной и приступить завершающим частям нашей эпопеи, а именно упаковка приложения в Docker контейнер, бесплатная публикация бота на PAAS платформу Heroku, CI приложения с помощью Github и Heroku.
Для чтобы наше приложение добавить в контейнер нам потребуется создать Dockerfile в корневом каталоге нашего приложения. Dockerfile будет состоять из таких команд как.
# сообщает нам на каком образе будет построен наш образ
FROM python:3.7
# копирует файл зависимостей в наш образ
COPY /requirements.txt /app/requirements.txt
# задаем рабочую директорию
WORKDIR /app
# запускаем команду которая установит все зависимости для нашего проекта
RUN pip install -r /app/requirements.txt
# копируем все остальные файлы нашего приложения в рабочую директорию
COPY . /app
# заупскаем наше приложение
CMD python /app/setup.py
Для публикации необходимо создать аккаунт на платформе Heroku и выбрать бесплатный план обслуживания. Создать новое приложение и немного настроить его, а именно:
После того как MongoDb добавлена к вашему приложению, переходим на страницу управления базой данных и копируем строку соединения с базой(connection string) и добавляем ее в переменную окружения. Пробуем вручную опубликовать на Heroku, убедитесь что приложение создано на Heroku и у вас установлено ПО для контейнеризации приложений Docker на машине.
cd project_folder_name # go to project folder
heroku container:login # login to Heroku
Heroku apps # see available apps and copy name to next command
heroku container:push web --app anticovid19bot #push docker image to Heroku
heroku container:release web --app anticovid19bot #release docker image to Heroku
heroku logs --tail --app anticovid19bot # see what’s going on (logs)
На этом подготовка нашего Heroku приложения закончена, переходим к настройке CI.
Для настройки CI необходимо создать файл heroku.yml в корневом каталоге приложения и указать в нем как мы хотим собирать наше приложение. В нашем случае мы хотим использовать docker контейнер, так и пишем.
build:
  docker:
    web: Dockerfile
Сохраняем файл манифеста heroku.yml и делаем коммит и пуш в ранее созданный репозиторий на Github. Переходим на сайт heroku, находим наше приложение и во вкладке “Deploy” выбираем Github “connect to github” и настраиваем соединение и выбираем репозиторий и ветку за которой heroku будет следить и при каждом новом коммите запускать сборку и публикацию.
На этом все, наш бот готов к работе и дальнейшему развитию и борьбе с COVID-19 c помощью информирования населения по средствам Telegram.
Как известно человек боится того чего не знает, не понимает, не может предсказать. Чтобы страха и паники не было нужна достоверная и доступная информация, а также осмысление ситуации насколько возможно широко.
Приведу пример, цифра 10 000 сама по себе не страшна, но что будет если мы приправим ее небольшим контекстом, 10 000 смертей, выглядит страшнее, не правда ли? Если дальше продолжить эксперимент с добавлением контекста то можно дойти до ужасающих результатов, допустим “10000 новых смертей от коронавируса в России в день” и тогда мы получим то, что называется паника, которое настолько сильна, что подавляет развитие разума и логического мышления, заменяя его подавляющим чувством тревоги и неистового возбуждения, совместимого с животной реакцией «дерись или беги».
Именно поэтому стоит критически анализировать информацию, особенно в наше время.
Эта статья не претендует на абсолютные знания технологий которые здесь используются, но дает понимание от начала и до конца как сделать работающее приложение и интегрировать его с мессенджером Telegram, а также показывает читателю как сделать полный цикл от начала разработки и до автоматической публикации на сервер совершенно бесплатно.
Спасибо тем кто дочитал до конца за внимание. Приятного кодинга!
Код бота вы можете посмотреть здесь, а попробовать как работает бот можно здесь.
Для большей наглядности я снял видео-инструкцию где показан каждый шаг разработки бота.